Boring Pip: Understanding Input Parameters and How EA Works – Miscellaneous – February 24, 2024

This post explains EA’s input settings and provides some operational tips.
Boring Pips EA combines modern trading algorithms with classic trading techniques related to momentum, supply and demand. Nonetheless, it maintains simplicity and efficiency in both setup and operation.
Unlike many other EAs that overwhelm users with long lists of input parameters, Boring Pips only allows for a few settings adjustments based on the user’s risk appetite. I spent two years optimizing the startup and shutdown parameters of the EA using five variants of Boring Pips, integrating and hiding the best settings into the default EA. This prevents users from over-optimizing for risk and ensures consistency in EA use.
The typical EA setup process takes 1-2 minutes and a setup file is prepared and sent to you.
My advice is to use the 3 risk modes for the first 2-3 months: boredom, low risk, and medium risk. Before making any changes to your “Personal Settings”, please familiarize yourself with how the EA works and make sure you understand its settings.
You may also refer to the Frequently Asked Questions (FAQs) at the following link:
B. Boring Pips input table description
The Boring Pips setup table consists of 16 items divided into 4 sections.
By introducing the EA’s name and version, users can also change the EA’s ‘magic number’.
1. Expert advice: This is the name of EA.
2. Version: This is the current version.
3. Magic number: This is the ID that the Boring Pips position will have, helping EA manage the position separately. If you use Boring Pips with other EAs, make sure each EA’s magic number is unique.
4. Trading symbols: Enter the currency pair you want to trade with Boring Pips. Things to note when entering currency pairs:
– Enter the currency pair exactly as provided by your broker, including suffixes/prefixes where applicable (e.g. AUDNZDf, AUDNZD.g…)
– Separate currency pairs with spaces.
– The maximum number of entries in ‘Trading Symbols’ is 3 currency pairs. If you enter 1 or 2 currency pairs, only those pairs will be traded. If you enter more than 3 currency pairs, only a maximum of 3 currency pairs will be traded.
– If you want to trade more than 3 currency pairs, we recommend installing Boring Pips on more than 1 chart. Different currency pairs are entered into the ‘Trading Symbols’ on this chart.
Please see question 28 in the FAQ for more details.
5. Risky Fashion: Choose the risk mode that suits you among the four risk modes from low to high: boring mode, low risk, medium risk, and high risk.
For more information, see question 12 in the FAQ.
6. Base balance: This is the basis for calculating the trading volume for your account.
– By default, the default balance is set to 0, in which case the total balance in your account is used to calculate trading volume according to the following formula: Initial trading volume = account balance / 500 USD x 0.01 lot.
– If you enter a number here, EA will use this number to calculate your trading volume, regardless of your account balance. Formula: Initial Volume = Base Balance / 500 USD x 0.01 Lot.
– If your account’s default currency is USD (or EUR, since the exchange rate of 1 EUR is close to 1 USD), you can leave the ‘Default Balance’ as default (0).
– IMPORTANT NOTE: Base balance is measured in USD. If your account uses a base currency other than USD (or EUR), you must convert it to USD and enter it in your base balance so that EA can accurately calculate your trading volume.
For more information, see question 22 in the FAQ.
III. Custom Settings
The current parameters shown in this section are used in the default settings. To fix this, you need to enable ‘Personalize your trading style’ and adjust the parameters to your liking.
We recommend changing your custom settings only after you’ve used your EA for 2-3 months and understand how it works.
7. Personalize your trading style: For changes to personal settings to take effect, you must first switch them to ON.
8. order quantity: Defines the initial volume of the first location.
By default it is set to 0, which means that volume will not change compared to the default setting. If you enter another number here, EA will use it as the volume.
Note: You must use a period ‘.’ for the decimal part. (not a comma ‘,’), the volume should be within the minimum to maximum volume range offered by your broker (usually 0.01 to 100). Only 2 decimal places are allowed.
9. Transaction frequency: Adjust the EA’s transaction frequency to low/medium/high levels.
10. Take Profit (Pips): Set the take profit level for the EA’s trades. This only applies to the first position, subsequent positions in the grid sequence are closed based on Fibonacci retracement levels.
11. Stop loss (pips): Set the stop loss level for the EA position.
12. Grid Strategy: Enabled by default. When the grid is turned off, each signal generated by the EA goes into positions 1-2 depending on the hazard mode in use.
13. Martingale Strategy: Enabled by default. By disabling Martingale, EA’s position will enter at the same volume as the initial position. Martingale is meaningless if the grid strategy is off.
IV. crisis management
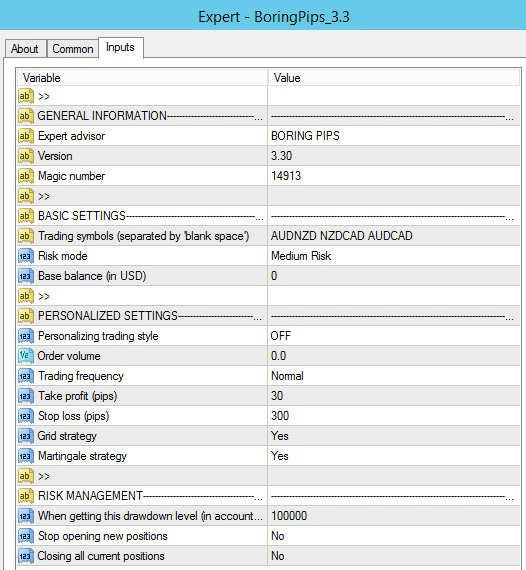
The setup part allows the EA to execute some actions (liquidate positions/stop trades) when a specified maximum drawdown level is reached.
14. When this decline is achieved: After setting the maximum reduction level in the base currency, if this level is violated, the EA will take action under Sections 15 and 16. There must not be a negative sign ‘-‘ before the decrement number. For example, if you want the EA to stop trading or close all positions when a loss of $1000 is reached, simply enter ‘1000’.
15. Stop creating new positions: Yes No. Option to stop opening new positions once condition 14 is met. In this case, EA will manage and close existing positions as normal while also stopping the opening of new positions.
16. Liquidate all current positions: Yes No. Option to close all current positions managed by EA when condition 14 is met.
EA only monitors/liquidates positions it manages. The drawdown range for Condition 14 is calculated only for positions opened by Boring Pips.
C. Manually pause trading and close positions
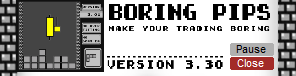
Boring Pips users can also pause trading or close all positions whenever they wish by utilizing the Pause and Close buttons in the control panel.
– ‘Pause’ button
: Gray in normal state. When you click it, a confirmation dialog will appear to pause trading. Once confirmed, EA will temporarily stop opening new positions, but current positions will continue to be managed and closed as usual.
While your EA is paused, the ‘Pause’ button will change to ‘Paused’ and turn red.
Clicking this button again will return your EA to normal trading mode.
If you are unable to reactivate your EA (the ‘Pause’ button still says ‘Paused’ in red), go to Settings and check sections 14 and 15 under ‘Risk Management’. The transaction may have been halted because the EA has reached its maximum allowed loss. In this case, please first adjust the conditions in Section 14 or disable the actions in Section 15 and then use the ‘Pause’ button to re-enable the EA.
– ‘Close’ button
: Used to liquidate all positions managed by Boring Pips. When you click this button, a confirmation dialog box will appear confirming your intention to liquidate all positions. Once confirmed, EA will close all currently open positions.
————————————- ————- ———————— ————————– ——–
If you’ve read this far and still have questions about EA: 31 frequently asked questions here.
Or leave me a personal massage.
thank you Andy.
")
")
")
