Supply Demand EA ProBot Manual – Trading System – May 13, 2024

EA is designed to: automated trading In ~ Supply and demand zones. There are several input parameters you can use depending on your trading style and personal preferences.
MT4 version: https://www.mql5.com/en/market/product/116645
MT5 version: https://www.mql5.com/en/market/product/117023
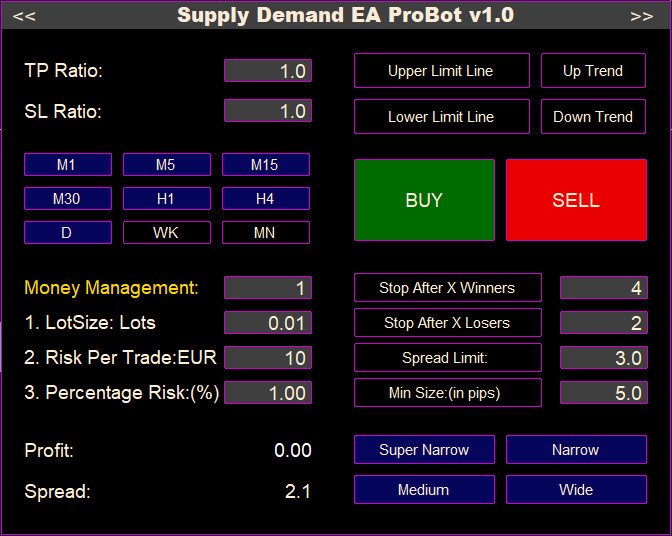
“TP ratio” and “SL Ratio”. From these input parameters you can set stop loss and take profit ratios. There are also two ways to calculate TP and SL from input variables: If you want stop loss and take profit to be zone based or ATR based. If you select Zone Based, Take Profit and Stop Loss will be calculated. Depending on the area size. For example, if area size is 10 pips, TP is 2 and SL is 3, then TP will be 2*10=20 pips and SL will be 3*10=30 pips. If you select ATR based, the calculation will be based on the ATR price of the current period. If you choose one to one, it becomes 11. Otherwise, the current ATR price for the current period is estimated.
“Fund Management” . In this section you can choose how you want to manage your funds. There are three options available:
- Fixed lot size: If you select this option, the lot size will remain constant for all transactions.
- Risk-Based Lot Size: If you choose this method, your lot size will be automatically adjusted based on your pre-determined risk per trade.
- Calculate percentage of capital: If you select this option, lot size will be calculated based on a percentage of total capital.
“upper limit” button. Clicking the upper limit button creates an upper limit on the chart. You can drag the line to your desired price level. The existence of a cap means that ea trades in the following areas: This is only possible below this upper limit.
“lower limit” button. Clicking the lower limit button creates a lower limit on the chart. You can drag the line to your desired price level. The existence of a floor means that the EA trades in the area formed above this floor.
You can have both an upper and lower bound. This allows you to create a price range where EA will only trade within this price range.
“period” button. In this section you can select the time period you wish to trade. ea is multiple time zones. This means there is no need to open multiple time zones of the same pair. You can get deals whenever you want in a single time zone.
“Rising trend” button. Clicking this button creates a bullish channel. After creating a channel, you can convert it as you wish. This channel is not dynamic. This means that it does not change while a new candle is forming. You can create a bullish trendline instead of a channel from the input parameters. If this channel exists on the chart, the EA will only place trades in the supply and demand areas formed within this channel. Channels can be combined with upper or lower limits if desired. When a bullish trend line is created, the trading direction is automatically buy. If you want, you can unclick the buy direction and select the sell direction, but this can be risky.
“Downward trend” button. At the touch of a button a bearish channel is created. After you create a channel, you can convert it as you wish. From the input parameters, you can create a bearish trendline instead of a bearish channel. After creating a bearish channel, the EA places trades only in the areas formed within this channel. Channels can be combined with upper or lower limits if desired. When a bearish trend line is created, the trading direction automatically becomes Sell. If you wish, you can unclick the sell direction and select the buy direction, but this is not recommended.
Important note: If you have activated bullish or bearish channels and trendlines, you will not be able to trade on periods higher than the current period. This is because trend lines and channels cannot operate on time periods higher than the current time period. This is a platform limitation and has nothing to do with EA itself. For this reason, pressing the “Uptrend” or “Downtrend” buttons automatically disables all current time periods above. For example, clicking the “Uptrend” button in 1 hour increments will disable all time periods longer than 1 hour. You must trade in less than 1 hour.
“Stop after x winner” button. This parameter indicates how many winning trades the EA will stop after. For example, if you click the button and set the input parameter to 2, the EA will stop after two winning trades. Once you reach the winning trade of the desired amount, you will receive a message informing you that the EA has been stopped. If you want to restart, you don’t have to click the button, you have to click again to restart. ea starts working again.
“Stop after X losers” button. This parameter indicates how many losing trades the EA will stop after. For example, click the button and enter the input parameters: 4 EA shuts down after two loser trades After sum When the losing trade amount is reached, you will see a message saying that the EA has been stopped. To restart, you must unclick the button and then click it again to restart. ea starts working again.
“Buy” and “sell” button. In this section of the panel You can choose your trading direction. If you believe the market bias is bullish, you can activate your buy direction. In this case, the EA only conducts purchase transactions in the demand zone. If you think the market bias is bearish, you can activate a sell direction. In this case, EA will conduct sales transactions only in the supply zone. You can also activate both buy and sell directions. In this case, the EA makes a buy trade in the demand zone and a sell trade in the supply zone. If you don’t press the directional button the EA won’t trade at all.
“Wide” “Medium” “Narrow” “Super narrow” button. There are four types of areas: Here you can select the type of zone you wish to trade with. For example, you may choose to trade only in the narrow and very narrow supply and demand zones and not trade in the wide and medium zones.
“Minimize panel buttons” button. There is a minimize button “<<" in the upper left corner of the trading panel. Click to minimize the panel. If you want to see more candles on the chart, you can use this feature.
“Extended panel button” button. There is an extended panel button “>>” at the top right of the trading panel. Click on it and you will see an extended panel that offers more features.
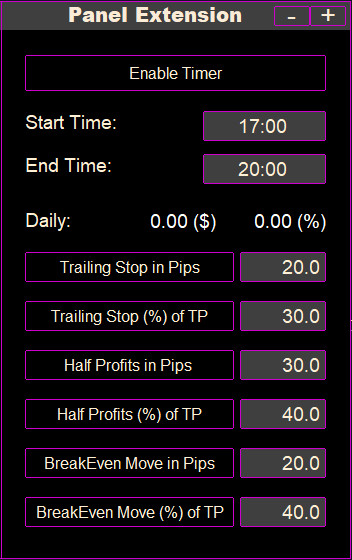
to “Extension Panel” You can obtain daily profit and loss and daily (%) profit and loss information.
“Time range” button. By activating this button, EA will only process transactions within this specific time frame. This is the current time in your area and not your broker’s time. So, if the start time is 15:00 and the end time is 20:00, the EA will only process trades at that specific time.
“Spread Limit” button. ea will not place the above trade when the spread of the current pair is greater than this price input. This input parameter prevents trading when spreads are very wide, as spreads can sometimes be very wide in volatile situations such as press releases. For example, if you are on Eurusd and you do not want to trade when the spread exceeds 2 pips, press the button and enter the input parameter to 2.
“Stop tracking in pips” . This indicates the level at which the trailing stop loss is activated and the distance in pips from the current price. For example, if you click the button and set the input parameter to 20, this means that when the price is 20 pips in profit, the trailing stop loss will be activated and set 20 pips away from the current price.
“Stop tracking TP (%)” . This works the same as above, but sets the percentage level instead of the pip level. For example, if you click the button and set the input parameter to 40 and the Take Profit level is 30 pips away from the order opening price. This means that when the price reaches 40%*30pips=12 pips of profit, the trailing stop loss will be activated and set 12 pips away from the current price.
“Half a pip profit”. This indicates what level of your profits you want to take. So, let’s say your input parameters are 30 pips and your open trade is 2 lots. When the price reaches 30 pips, the 1 lot portion is liquidated and 1 lot trading is initiated.
“Half profit of TP (%)”. This works the same as above, but sets the percentage level instead of the pip level. For example, click the button and enter the input parameters: 20 and the take profit level is 100 pips away from the order opening price. This means that you will make a profit when the price reaches 20%*100pips=20 pips. Then, the 1 lot portion is liquidated and 1 lot trading is initiated.
“Move to break-even point”. This indicates the level at which the stop loss will be moved to the break-even point. Setting this parameter to 20 pips means that you will make a profit if the price rises by 20 pips. The stop loss is moved to the break-even point, which locks in profits.
“TP’s break-even movement (%)”. This works the same as above, but sets the percentage level instead of the pip level. For example, if you click the button and set the input parameter to 60 and the Take Profit level is 50 pips away from the order opening price, this means that when the price reaches a profit of 50%*60pips=30 pips: The stop loss is moved to the break-even point.
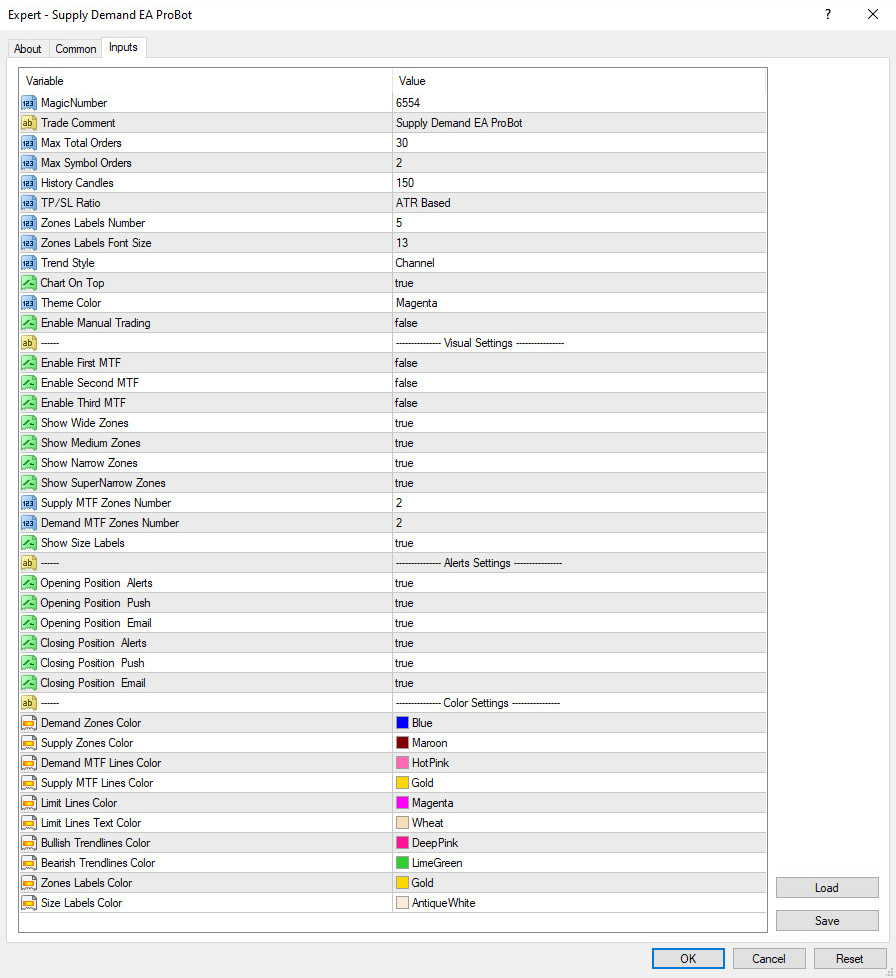
Max number of symbol orders/maximum total number of orders
You can choose the maximum order amount an EA can open for a particular symbol and the maximum trade amount an EA can open in general.
“Trend Style”. You can choose between trend lines and channels. After selecting a channel, press the “Uptrend” or “Downtrend” button to create a bullish or bearish channel. Selecting a trend line creates a bullish or bearish trend line.
“Charts on top”. If this variable is true, when an EA places a new trade, the pair and chart on which the trade was created will automatically be displayed at the top.
visual settings
You can visualize three time periods beyond the present. You can see the first period above the current, second and third on the chart. For example, if you have a 1-hour granularity, you might see 4-hour, daily, and weekly areas. Dashed line representing the anode current in the first period, solid line representing the second period above the current, and dashed line representing the third period above the current.
Only certain types of areas can be visualized. Only certain types of areas are visible on the chart. For example, you can show only narrow or very narrow areas of a chart and hide the broad and medium types of areas.
“Theme Color”. You can change the color of the panel. There are 6 options to choose from. You can use whatever you like and best matches the colors in the chart.
“Enable manual trading”. You can also activate manual trading and place market and limit orders by clicking on the zone label next to the zone.
Notification settings
You can receive notifications, push notifications, and emails. When a new transaction opens or a transaction closes. So you can check the progress of your transactions in real time, even if you are far away from your PC. To receive push notifications, you need to download the mt4/mt5 application on your phone.
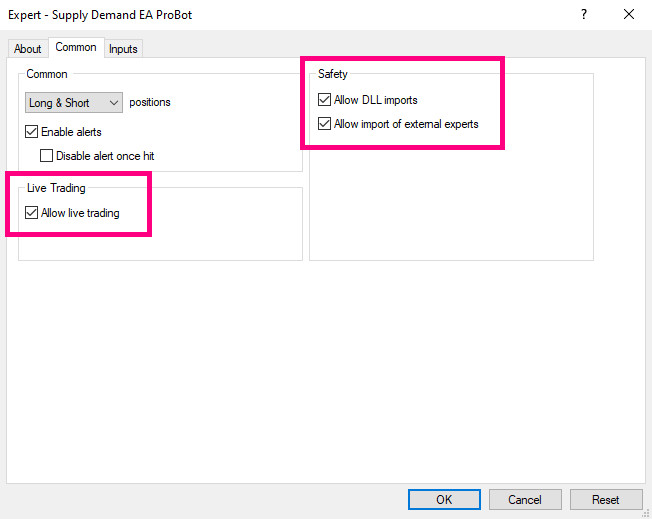

When attaching Supply Demand EA Probot For the first time in your chart, make sure the box above is checked.
Also check the following: “Automatic trading” The button on the trading platform will be activated. Otherwise, EA will not be able to make trades automatically.
If you find a bug or have recommendations on how to make this tool better, please send us a DM. I’d like to hear your suggestions.

")

