USER GUIDE – Arbency – Other – 22 April 2024

MT4 / MT5
1. What is Latency Arbitrage? What is the EA? How does Arbency enter & manage trades?
2. Input Definitions + On-Chart Buttons.
3. Terminal Set up.
4. Adjusting Price Levels.
5. Back Testing.
6. Q&A.
7. Problems with the EA / Troubleshooting.
1.
Latency Arbitrage is a strategy that aims to profit from quick price movement differences between two or more brokers feeds. Latency between price feeds occur because brokers acquire their market data using different methods from different sources. The trading strategies concept is to monitor the price movement of each feed in relation to one another and capitalise on delays between slower and faster feeds. During high volatility or quick unpredictable market movements, delays between platform feeds can happen, brokers with lessor server hardware/data sources can have moments of delay in their price feed that other brokers with more reliable hardware/data sources don’t experience, these delays may only last for seconds, but it allows traders to profit by anticipating where price will move.
Arbency has been meticulously developed to efficiently monitor, manage and capitalise on these inefficiencies. The expert will need to be loaded onto at least two different broker feeds and in its settings, one set up to ‘Send’, so the fast broker (Broker with reliable server hardware/source), and one set up to ‘Receive’, so the slow broker (Broker with lessor server hardware/source). When loaded onto two or more brokers, the expert will show the connected terminal price levels on each chart. These may need to be adjusted to be inside the buy and sell levels, more on that in section 4. When any of the connected terminal price levels Ask is equal to, or crosses above the buy level, a buy trade will be opened. When any of the connected terminal price levels Bid is equal to, or crosses below the sell level, a sell trade will be opened. What we’re expecting is that when quick movements happen for what ever reason, the slow feed will delay or lag behind the faster ones for a brief moment, giving us a glimpse into the future price of the slow feed. Arbency will then enter a trade in the direction shown by the faster feed. The expert is capable of entering at the closest market order price, or can place a pending order at the closest possible price to reduce slippage. Once a trade is entered, Arbency has multiple management functions designed around quickly closing once inefficiencies have passed. The expert also possesses optional functions to further control when trades are placed, such as a standard deviation based volatility filter and a trade only news filter to have the expert only trade during high impact news events.
Profitability with Arbency is determined by the set up it is being ran with, meaning the broker choices, broker connections, their hardware, the local hardware, locations, internet/connection speeds etc. The opened order management settings alone do not determine profitability with this expert. Any clients set up has to be conducted as an individual experiment, no one set file or broker combination will work all around, it may take time to find broker combinations that work for you and your unique set up (Hardware, connection, location etc), because of this, I don’t recommend Arbency to all clients. I would only recommend it those who have done their research into Latency Arbitrage and are willing to put the effort in that it will take to understand how to use the expert and find a set up that works for themselves.
2.
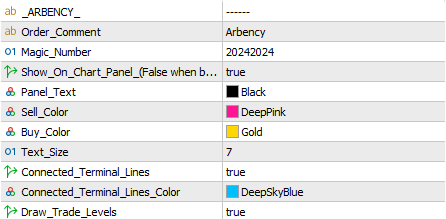
- Order Comment.– Comment displayed on each trade taken. – (Backtest comments have additional signal information.)
- Magic Number. – Number the EA uses to associate trades with itself – you only need to change the magic number if you are using the EA on two charts of the same pair, each chart would then need a different magic number.
- Show On Chart Comment.– Set true will display information on chart.
- Panel Text. – Panel text color.
- Sell Color. – Sell color.
- Buy Color. – Buy color.
- Text Size. – Panel text size.
- Connected Terminal Lines. – Set true will draw lines at other connected terminal price levels on the current chart.
- Connected Terminal Lines Color. – Color used for other connected terminal price level lines.
- Draw Trade Levels. – Set true will draw lines at the ‘Gap_Threshold’ levels needed to be reached to open trades.

- Custom Pair. – When connecting brokers that have different names for the same pair, use this input to create a joint custom connection name.
- Current Terminal Function. – What is the function of the current loaded instance. –
- Node (Send & Receive). – Allows the current terminal to both send & recevie information. Arbency WILL allow trades to be opened. (Best used when experimenting if unsure whether a broker is fast or slow.)
- Send (Fast Broker). – The current terminal will only send information. Arbency WILL NOT allow trades to be opened.
- Receive (Slow Broker). – The current terminal will only recevie information. Arbency WILL allow trades to be opened.

- (Node/Receive) Trade Type. – The type of trade Arbency will open on signals. –
- Market Order. – Arbency will open a market order at the closest possible price.
- Pending Order. – Arbency will open a pending order at the closest possible price.
- Gap Threshold (Points). – Gap size that connected terminal price levels must move to open a trade.

- Volatility Threshold. (Active>0.0) – Value that the volatility filter reading must be above to allow trades to open. (Only active above 0.0)

- Max Spread. (Pips) – Max spread allowed to open a trade – In pips.
- Max Slippage. (Pips) – Max slippage allowed to open a trade – used for brokers that may require a requote.
- Max Lot Size Allowed. – Max lot size allowed to be reached and/or placed.

- Close Trades If Equity Drops Below. – The EA will close all open trades if the accounts floating equity drops below this percent amount of the total account balance. – (Account Balance Percent) – (Active > 0.0)
- Only Open Trades Above Free Margin. – The EA will only open new trades when the accounts floating free margin is above this percent amount of the total account balance. – (Account Balance Percent) – (Active > 0.0)

- Limit Trade Hours. – True will allow trades from ‘Start Hour’ until ‘Stop Hour’ – Trades still open after hours will continue to be managed.
- Start Hour. – Hour to allow trades from. When ‘Limit Trade Hours’ is set true.
- Stop Hour. – Hour to stop trades at. When ‘Limit Trade Hours’ is set true. – (When the Stop_Hour is reached the Auto Price Alignment function will be triggered as a precaution.)
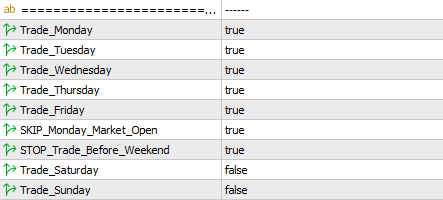
- Trade Monday.
- Trade Tuesday.
- Trade Wednesday.
- Trade Thursday.
- Trade Friday.
- Stop Trade Before Weekend. – True will stop the expert from placing trades and close any pending orders from Friday 18:00 until 23:59.
- Skip Monday Market Open. – True will stop the expert placing trades on market open until after 03:00 Monday morning.
- Trade Saturday.
- Trade Sunday.
- All Time & Day limiting inputs will trigger the Auto Price Alignment function for added saftey.

- Auto Money Management. – True will allow the EA to adjust the base lot in accordance with the account balance and the ‘Auto Risk Percent’ set.
- Auto Risk Percent. – (1 == 0.01 per 100USD) – Defines the risk used in the Auto Money Management. 1.0 being equal to 0.01 lots per 100 in account currency.
- Base_Lot. – The first lot size placed. (When Auto Money Management is set false)
- Stop Loss. – (Pips)
- Take Profit. – (Pips)

- Use Trail StopLoss. – True will allow the EA to adjust the stop loss as orders move into profit.
- Trail Start From. – Pips into profit to start the trailing stop.
- Move Trail Stop To. – Once activated move the stop this many pips into profit.
- Trail Step. – Adjust the stop loss further into profit when price moves this many pips.

- AutoClose Mode. – What value does the input below have. –
- ‘Currency_Amount‘ will make the EA search for a currency amounts worth of floating profit to use the AutoClose function.
- ‘Account_Percent‘ will make the expert search for a percent amount of the accounts balance to use the AutoClose function.
- ‘Seconds‘ – The EA will close any open pending order &/or trade after an input amount of seconds.
- Value To Close. – Value needed to active the AutoClose In Profit function. (The above input determines the value of this input.)
![]()
- Close On Trade Level Reached. – Arbency will close open trades when price reaches the level that triggered the signal.

- Only Trade News Events. – Set true, the expert will draw vertical lines onto the chart at times where high impact news events land. Arbency will start allowing trades the input minutes before an event, and will stop allowing trades when time has passed the input minuets after an event. Arbency will automaticlly turn off the Auto Price Alignement function the input minutes before an event, it will then automaticcly turn the Auto Price Alignement function on again when time has passed the input minuets after an event.
- Only Draw Future Lines. – Set true will draw only draw lines in front of the current time.
- Minutes To Start Trading Before Event. – The specified minuets to start allowing trades before an event.
- Minutes To Trade After Event. – The specified minuets to stop allowing trades after an event.
- High Event Line. – Color used for high impact event lines.
- Market Watch TimeZone. (GMT) – The GMT offset for your brokers data – (Most brokers are GMT+2)
– To use the Trade News Filter the following web address needs to be added to the WebRequest URL list : ‘ https://nfs.faireconomy.media/ ‘ –

- BackTest_Pair_2. – Second symbol name used for backtesting the core strategy against another set of data. – (When blank, in backtest Arbency will randomly trade each Friday to satisfy MQL validation.)
— Arbency includes an on chart panel to view information and control the strategy. Below are breif descriptions of its functionality. —
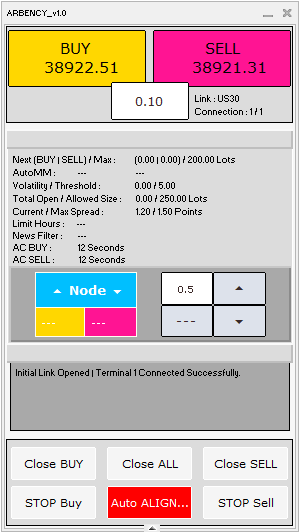
– The panel contains five main sections.
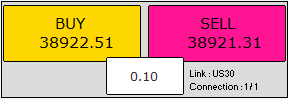
– In the top section at either side are buy and sell buttons used to enter manual transactions that will be taken over and managed by Arbency.
– In the center is a edit box used to select the lot size placed when a button is pressed.
– To the right of the edit box – ‘Link :’ – Shows the current connected session name. ‘Connection :’ – Shows the current connected terminals position / Number of connected terminals.
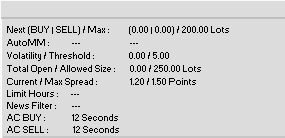
– Shown above is the infomation displayed on the panels main section.
— Holding your mouse over any text or button in your terminal will show a description.—
– From top to bottom we have :-
– Next / Max buy & sell trade amounts.
– Auto money management status.
– Current volatility filter reading & Volatility Threshold amount.
– Total open / Total allowed trade size.
– Current / Max spread.
– Time Limit status.
– Trade News Filter status.
– AutoClose Buy status.
– AutoClose Sell status.

– The box on the left side shows the current terminal function & the current largest connected terminal buy/sell price gap in pips / Gap Threshold.
– The box on the right is used for manual price level alignment. The top left edit box controls the amount a price level is adjusted when a directional button is pressed. The bottom left button controls which connected terminal price levels are selected for editing. (Pressing it will cycle through connected levels.) The two arrow buttons to the right control which direction price levels will be adjusted when pressed.

– Shown above is the basic log section of the panel.

– Close Buttons. – Pressed will close any open trade/pending on the current pair.
– Stop Buttons. – Pressed will stop the EA from placing anymore trades/pendings on the current pair untill the button is unpressed.
– Auto Align. – Controls the Auto Price Alignment function. When pressed in and active will show red, this will continually adjust the offset of any connected terminal price levels to align with the current bid/ask price while active. Once the button is unpressed, the function will be turned off, the button will show gray, price levels offset values will be locked and will also be allowed to be adjusted by the on chart buttons.
3.
– Below is a guide on how to set up two terminals to Send & Recieve. –
- First install and log into two sepreate MT5 / MT4 terminals.
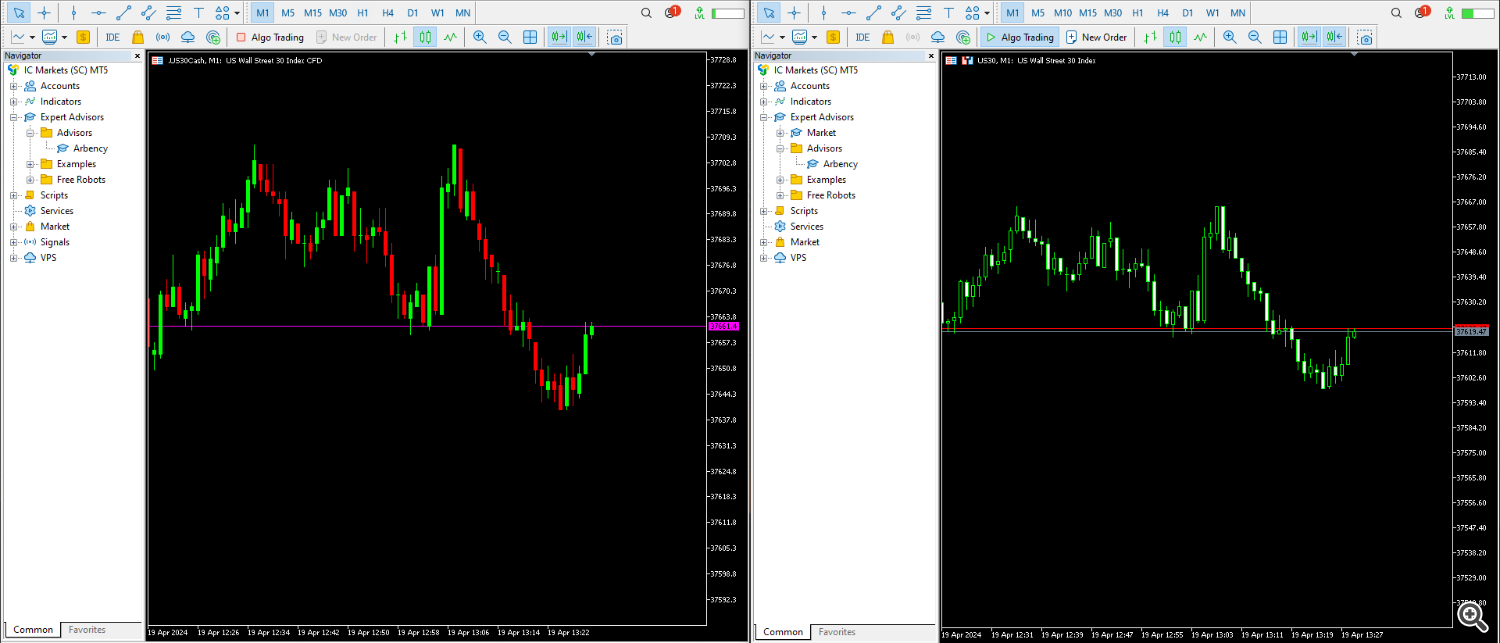
- Then on the first Terminal open Arbency onto a chart. Here I am using the ‘Custom_Pair’ input to join a symbol that has different names with each broker. I then set the ‘Current_Terminal_Function’ to ‘Send_(Fast Broker)’ and press OK.
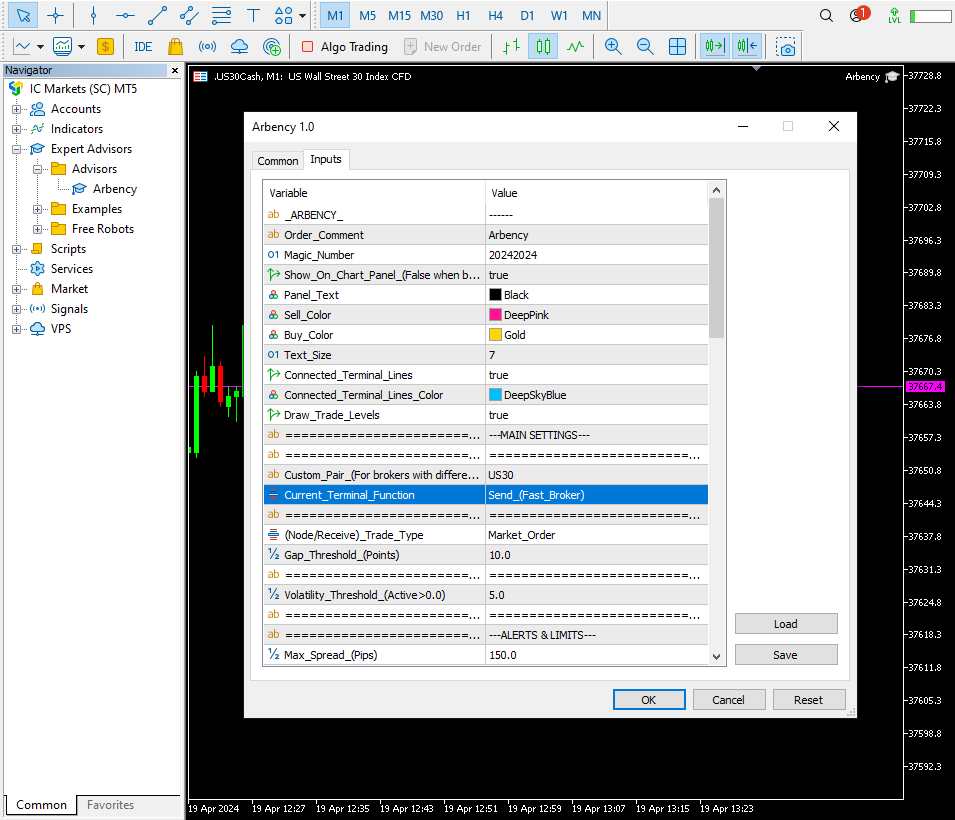
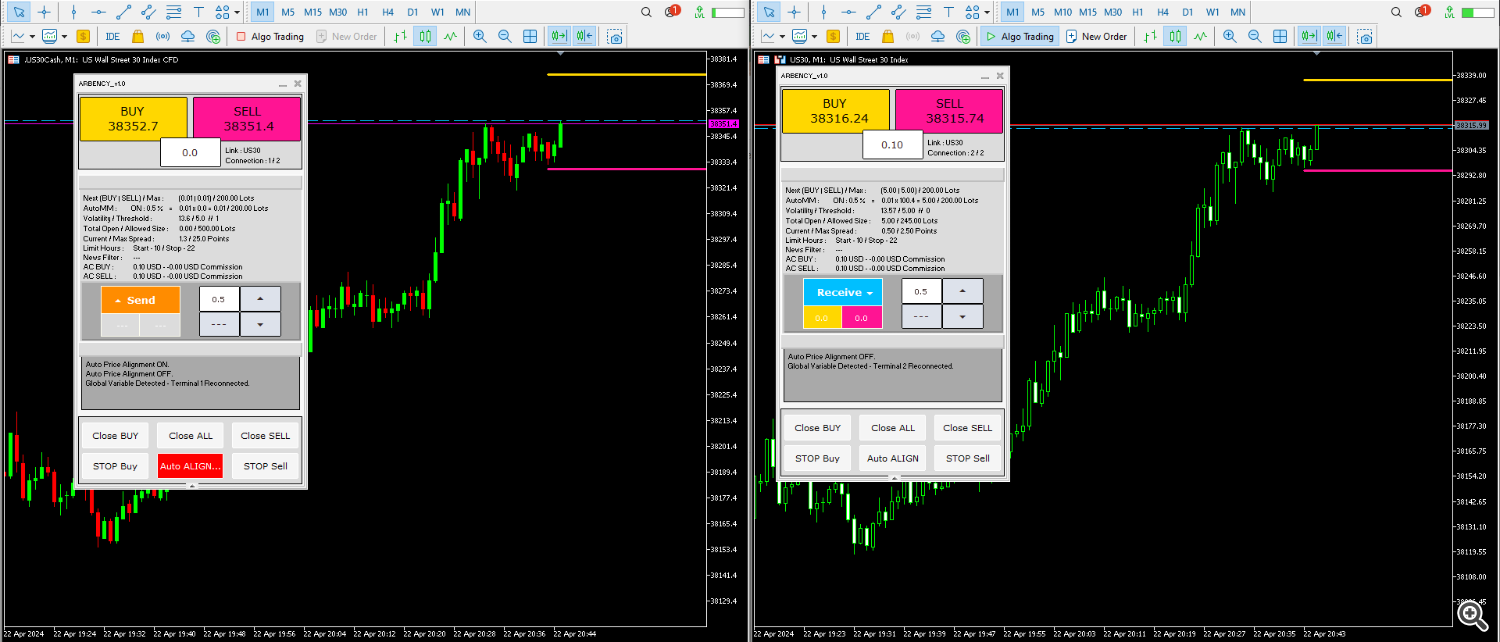
- Here the first broker is shown set up. I’ve left the Auto Price Alignment button pressed in so the function is active, connected terminal price levels will stick to the current bid/ask. I’ve also left the ‘Algo Trading’ button at the top of MT5 off.
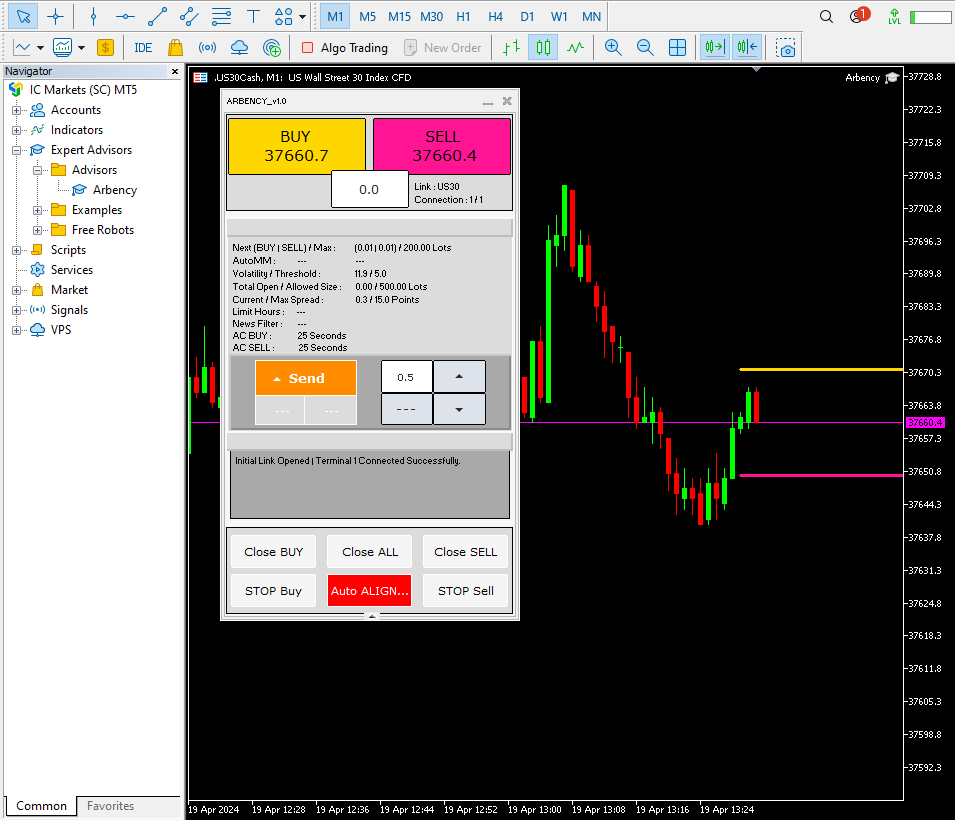
- On the second Terminal open Arbency. Here I’ve left the ‘Custom_Pair’ input blank since the loaded pair name already matches the custom session name created in the first terminal. I’ve then set the ‘Current_Terminal_Function’ to ‘Reciece_(Slow_Broker)’ and press OK.
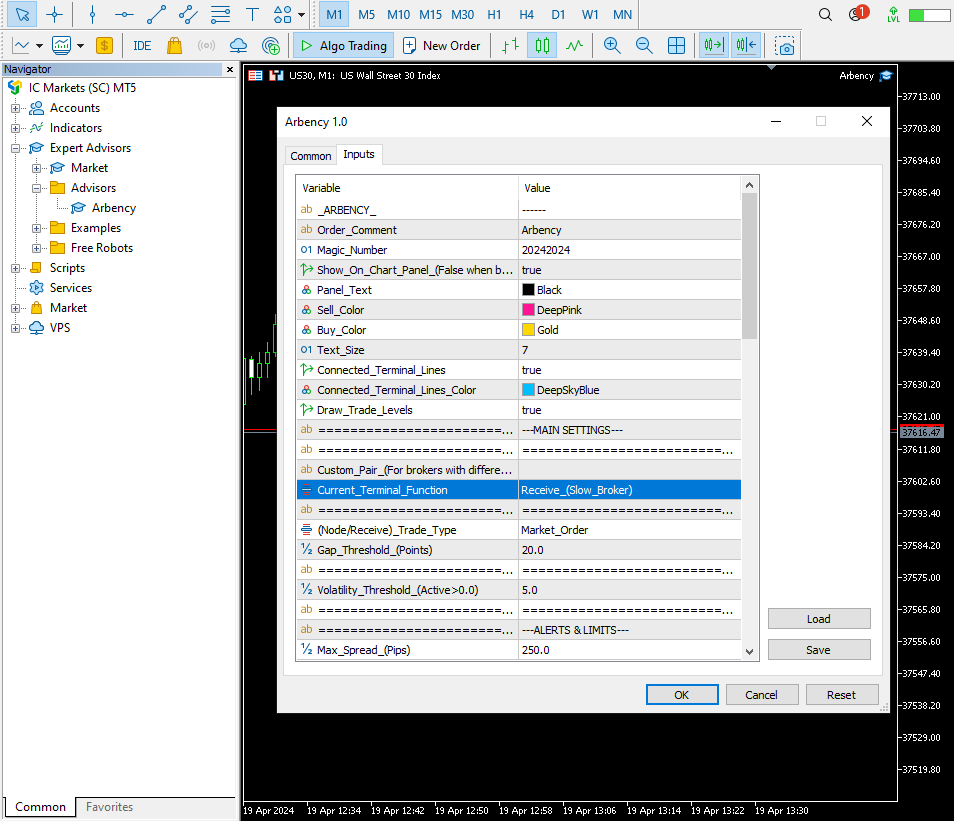
- Shown below is the second Terminal set up. I have unpressed the Auto Align button and deactivated the Auto Price Alignment function to allow free movemnet of connected terminal price levels. Ensure the ‘Algo Trading’ button of MT5/4 is prssed in to allow trades.
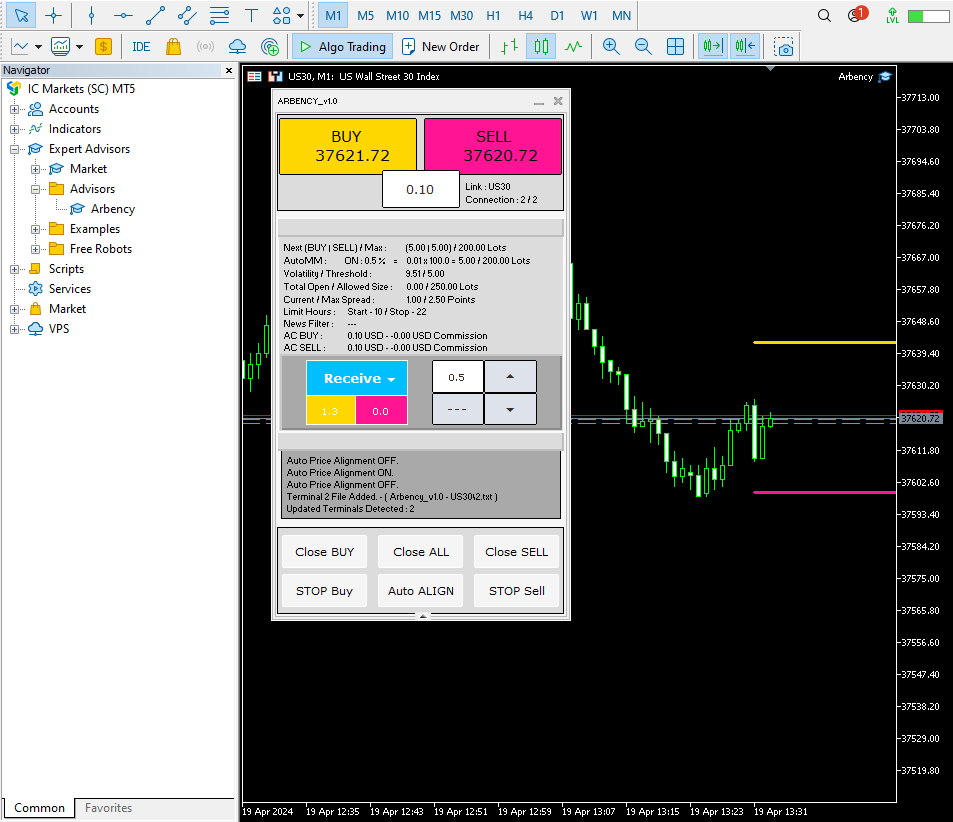
- Basic Arbency set up example waiting for opportunities.
4.
Price Level Alignment is an important part of the strategy.
Since prices provided by different brokers can differ by certain amounts, we must adjust their price levels with an offset to match our current loaded bid/ask as best as possible.
It’s also important to have the offset dialed in correctly because connected terminal price levels going above or below our set ‘Gap_Threshold’ will trigger trades.
Since we’re expecting one connection to be slower than the other, when auto alignment is off, offset values are locked, connected terminal price levels may change over time because of the faster/slower movments so the offset values will need readjusted to move levels back in sync with the bid/ask throughout a trading session. Keep an eye on connected terminal price levels and occasionally readjust by either pressing and unpressing the Auto Alignment button or using the panel up/down buttons to manually adjust.
- How to automatically adjust connected terminal price levels.
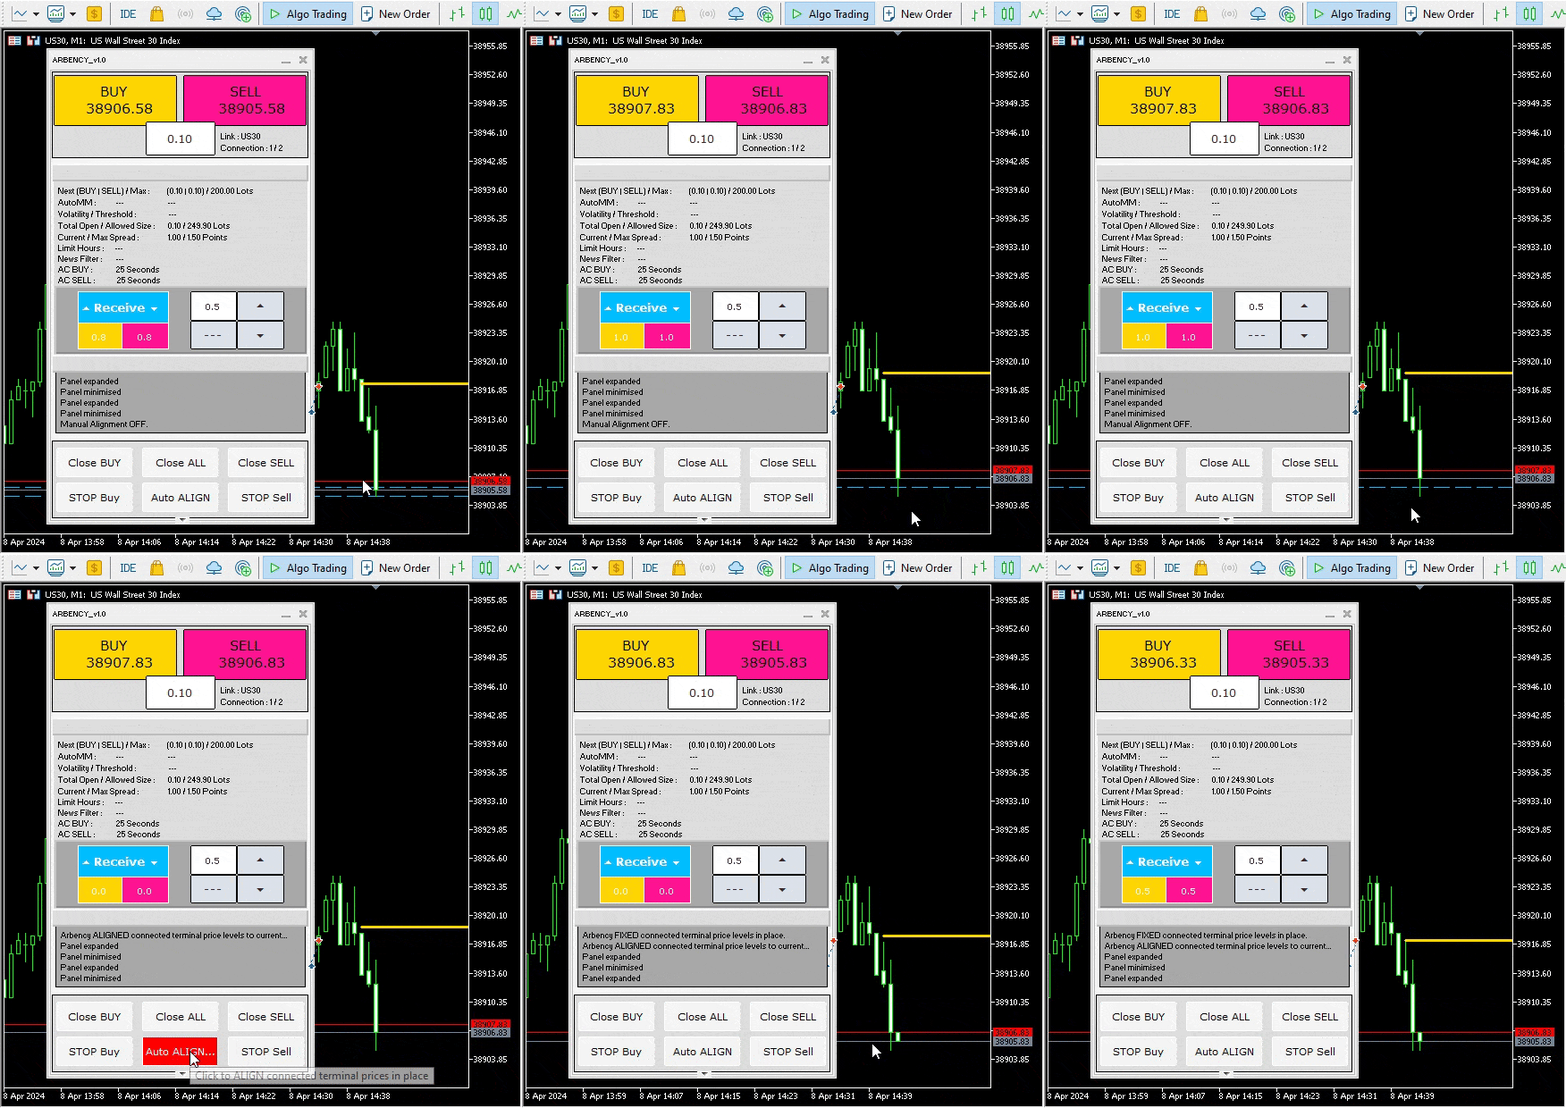
- Over time connected terminal price levels will become out of alignment with the current bid/ask. Pressing the Auto Align button will activate the Auto Price Alignment function, Arbency will continually change the offset value of each connection to keep them aligned with the current bid/ask. When unpressed, it will lock the offset values and allow connected terminal price levels to move freely.
- As a precaution Automatic Price Alignment is triggered on each initilisation, so meaning anytime inputs/timeframe etc change, the expert will activate the Auto Price Alignment function. The button will then need to be unpressed to deactivate the function and allow free movement again.
- How to manually adjust connected terminal price levels.
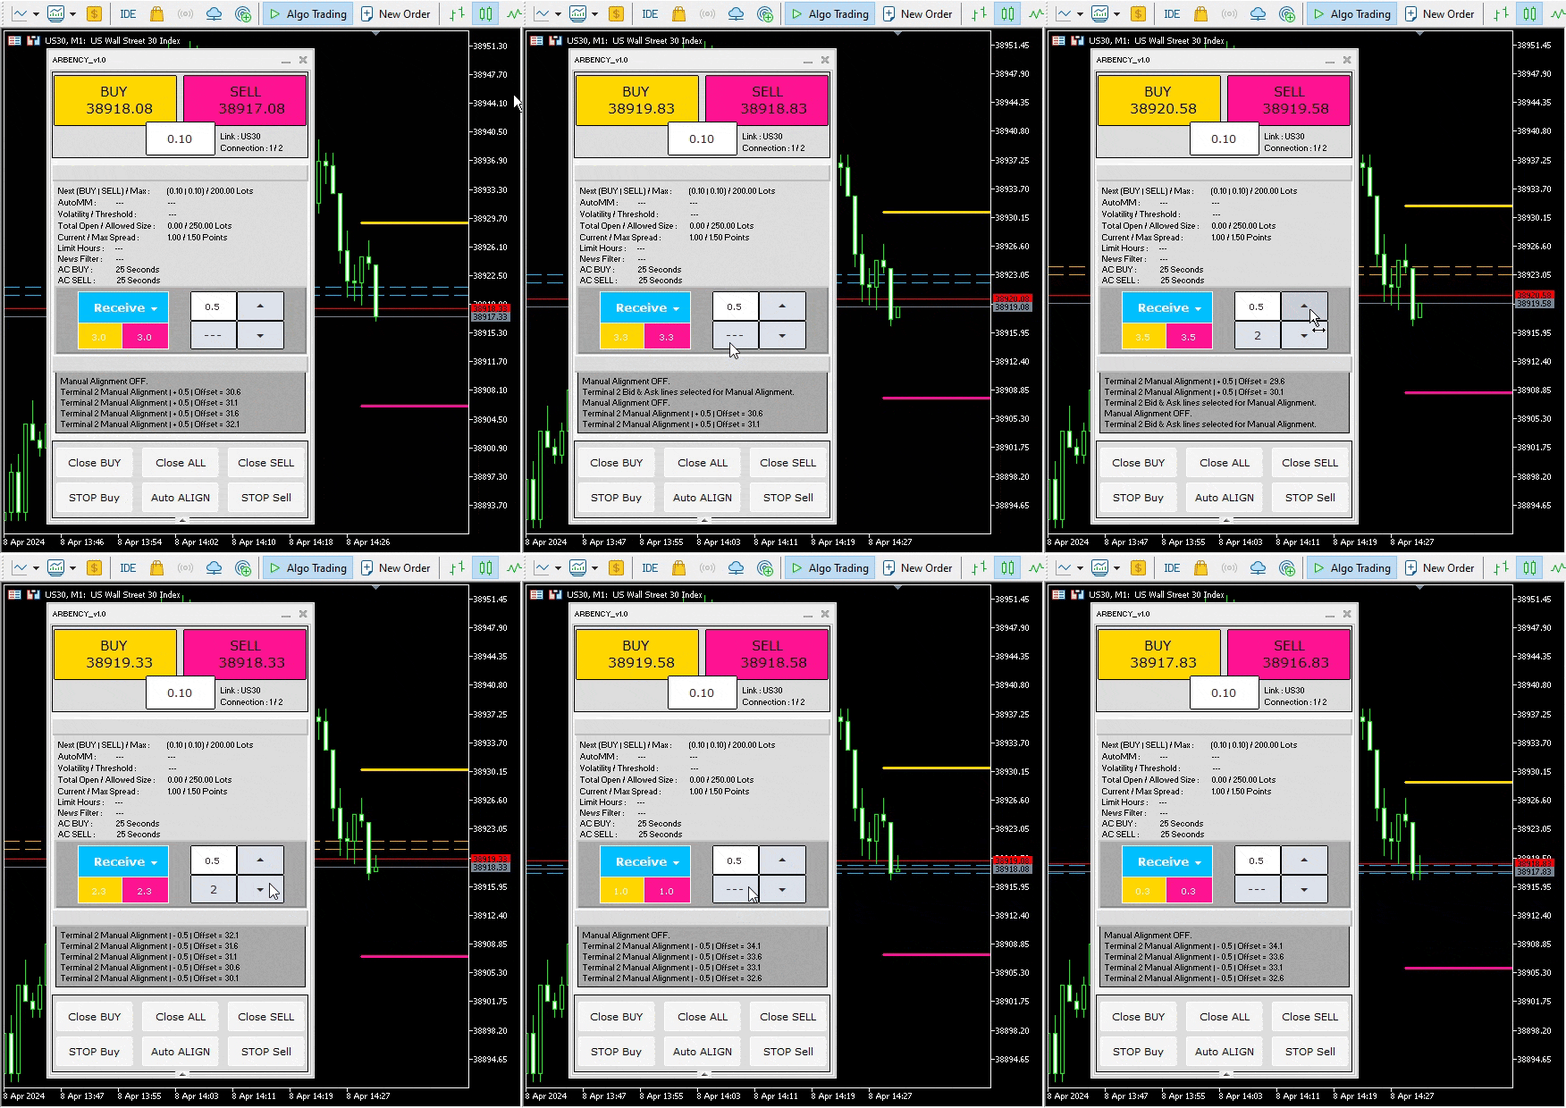
- Sometimes manual adjustment of connected terminal price levels is required to best align prices with the current bid/ask. To do this use the arrow buttons inside the on chart panel. Pressing the bottom left button will cycle through which connected terminal price level is currently selected for manual adjustment. Then using the arrows to the right, adjust the selected terminal price level to best align with the current bid/ask. (The Auto Align button must be unpressed to be able to manually edit price levels.)
- Why turn off the Auto Alignment button?
- When the button is pressed in, the Auto Price Alignment function is active, terminal price level offsets are unlocked and continually changing to best keep them aligned with the current bid/ask. We need the offset value to be locked, so connected terminal price levels that are moving faster than the current can move past our Gap_Threshold and trigger a trade.
5.
First I want to make it 100% clear the backtest function of this expert isn’t designed to create useable statistics or to be taken as an accurate representation of what a period of time would have performed like. The backtest function has been purely made to demonstrate how Arbency executes trades when trade signals occur and the functionality of its inputs on order management. Latency Arbitrage itself can’t be backtested. In forward, so real time, we’re looking to take advantage of platform delays and the connection differences between brokers servers, this can’t be emulated in a backtest.
But we can use the strategy tester to run two sets of data at the same time and compare the price movement differences in their ticks as they happened.
Problems arise with the price alignment, since it is something that must be edited as needed, sometimes by manual user input. How I’ve compensated for this in backtest is to link the Trade News Filter to the core strategy back test function, this will turn the Auto Price Alignment function on and off as high news events occur, it then aligns once per new minute candle while within an indent. It’s not perfect, it doesn’t always work as intended, but it allows us to simulate some trades being taken using the core strategy and break the information down to see how exactly trades were executed and managed.
– Below is a guide how to simulate Arbency’s core strategy using two sets of data. –
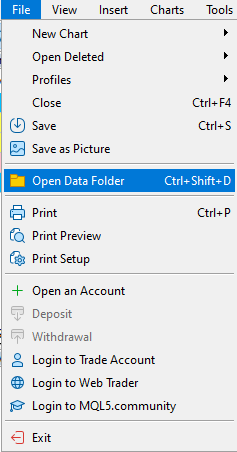
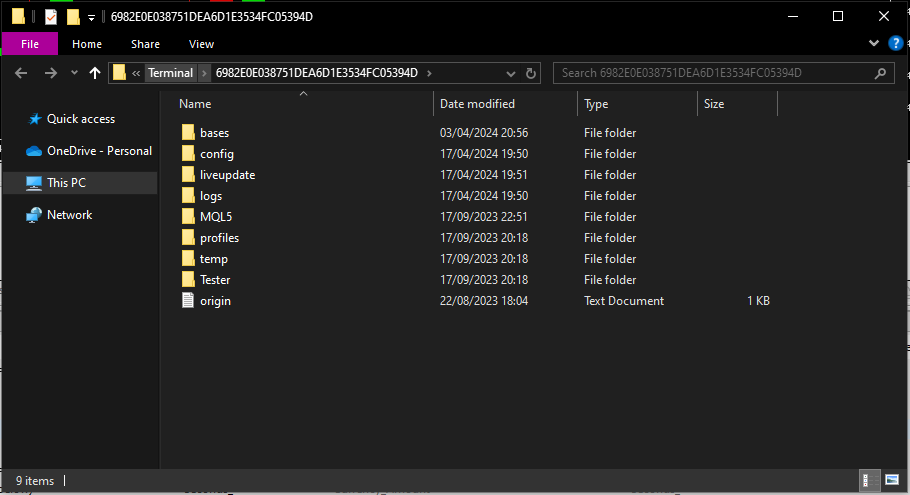
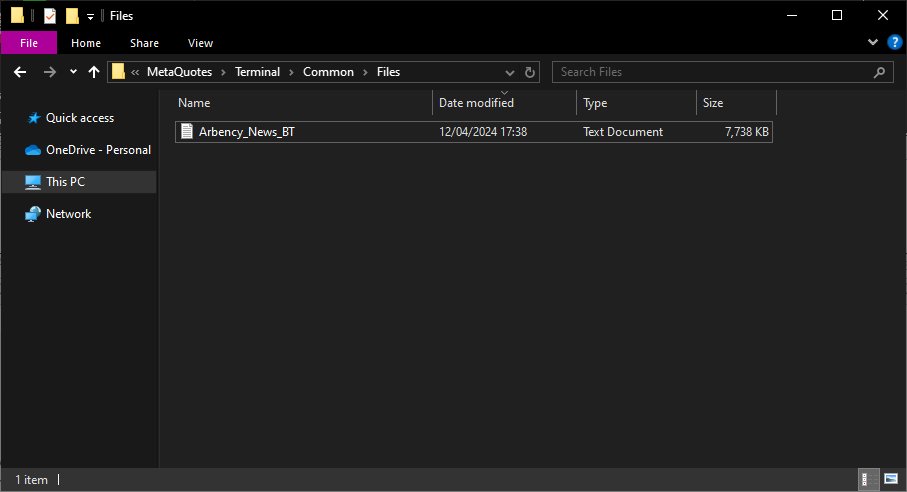
—
- Next you’ll need to download and export Bars and Ticks data for the pair you want to test. This will require another source like TickStory or TickData Manager.
- Example guides can be found here and here.
- It’s important the data downloaded matches the GMT offset of the core broker data that you want to test against.
- Once you have the Bar and Tick CSV files.
- Using MT5 go to – View – Symbols.
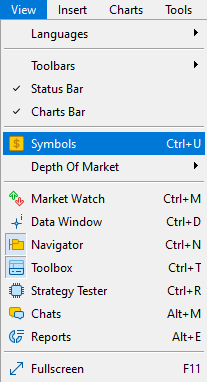
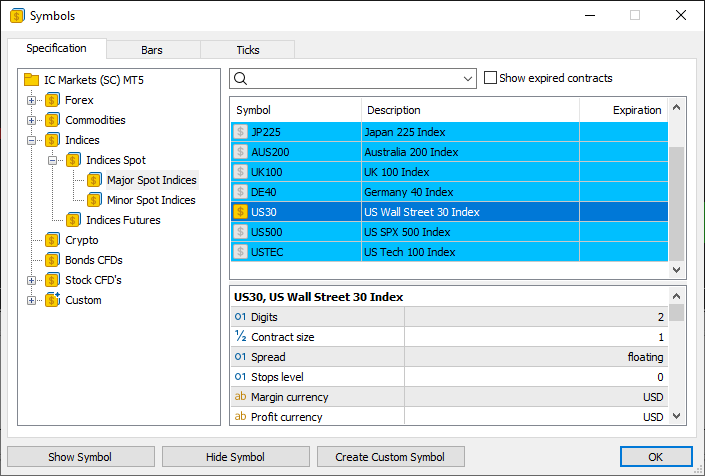
- Find the current broker specifications of the pair you’re wanting to use. Click it and press Create Custom Symbol.
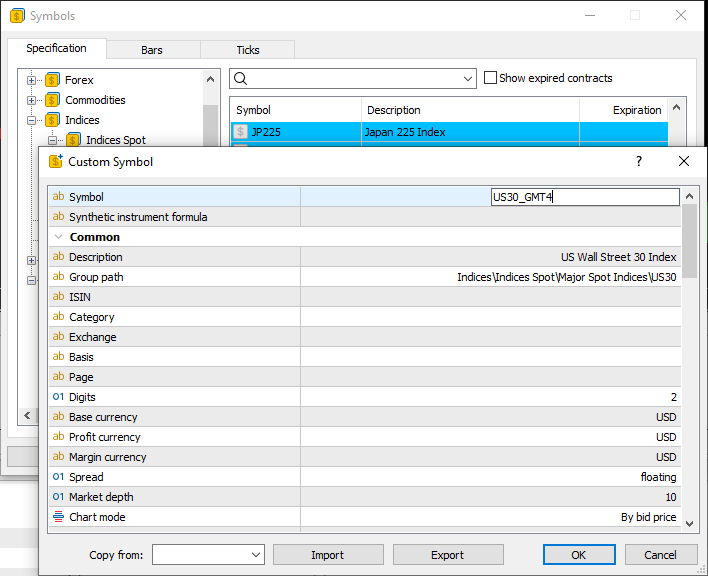
- Inside the Create Custom Symbol, change the symbol name to somthing else and press OK.
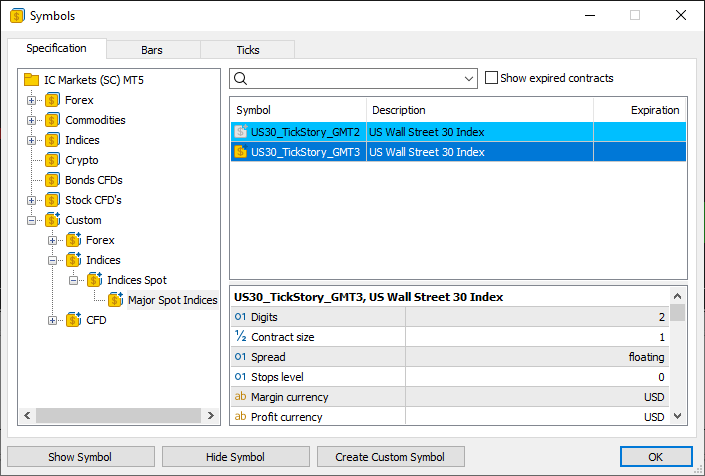
- Once created, go to the Custom section on the left then double click the Custom Pair you’ve just created to Show the Symbol.
- Go into the Bars tab and click Import Bars then find the matching bars CSV that was exported. Press OK.
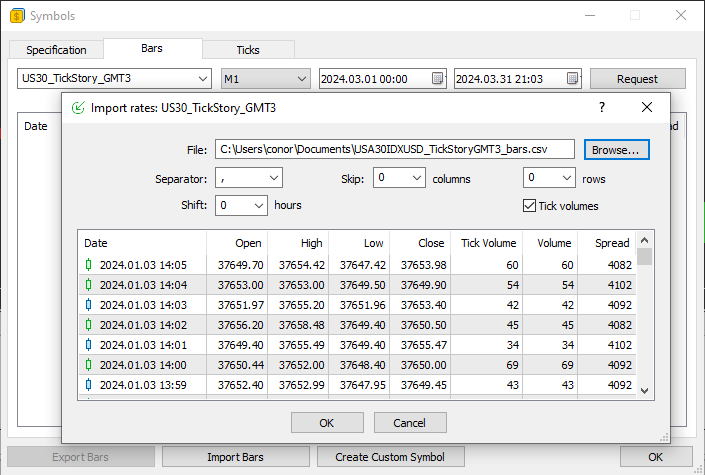
- Go into the Ticks tab and click Import Ticks then find the matching ticks CSV that was exported. Press OK. Press OK to close the Symbols window.
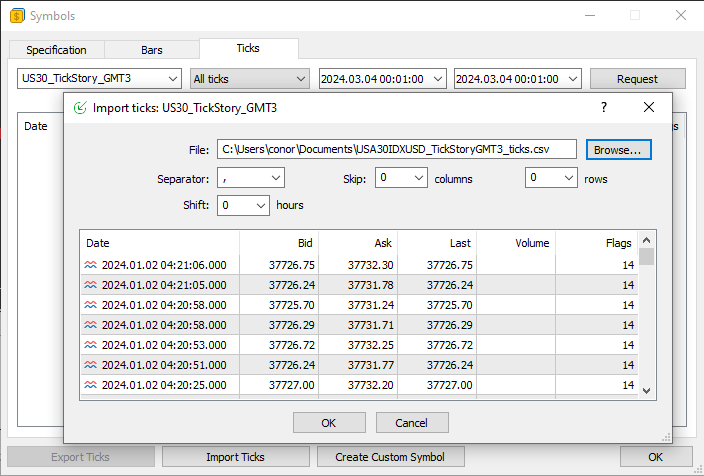
—
- Setting up to backtest any timeframe will work but it will be easier to watch movements from the smallest timeframe. Every tick based on real ticks should be used to ensure the most amount of ticks possible are being read.

- The ‘Market_Watch_TimeZone’ needs to be adjusted to match the GMT offset of the datas being tested on. The trade news filter input can be left set false, it will function regardless of the input setting.
- Type the name of the created custom symbol into the input ‘BackTest_Pair_2’.

—
- On the strategy tester start prints to the log will be made indicating successes & failures.
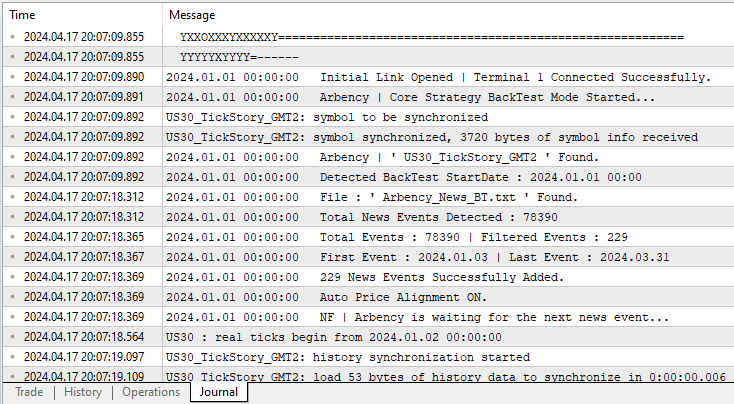
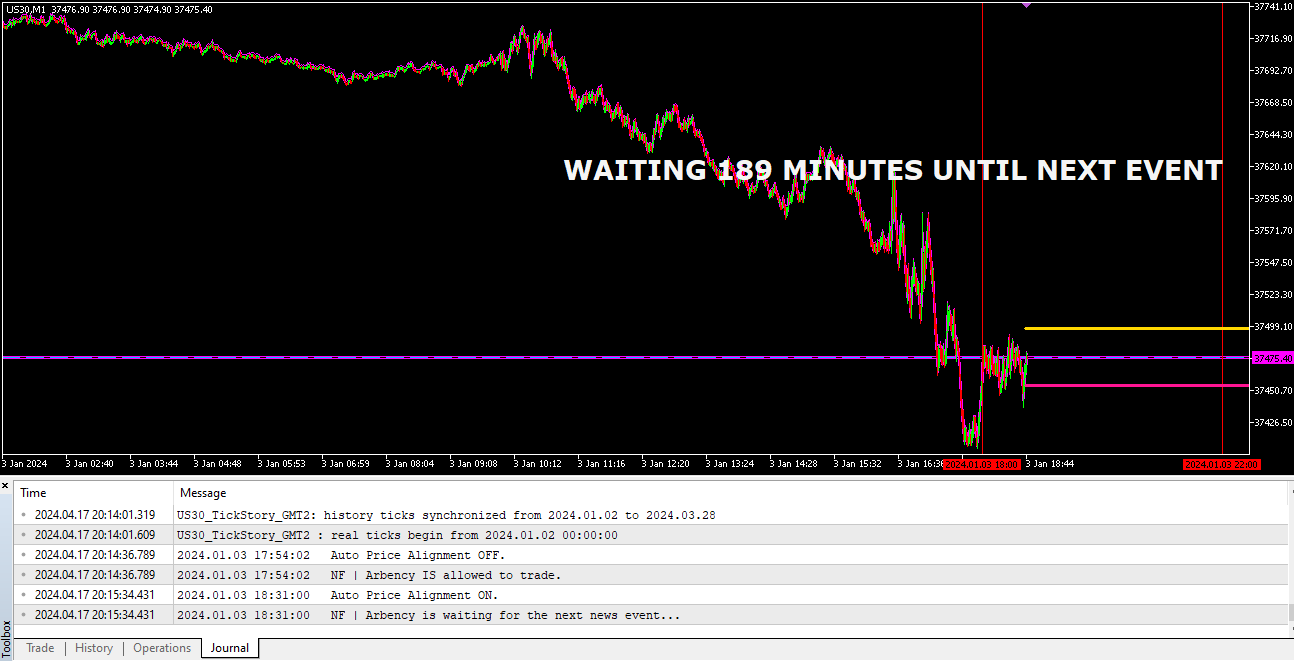
- Arbency waits until the input amount of minutes away from an event to deactivate the Auto Price Alignment function and begin searching for trades.
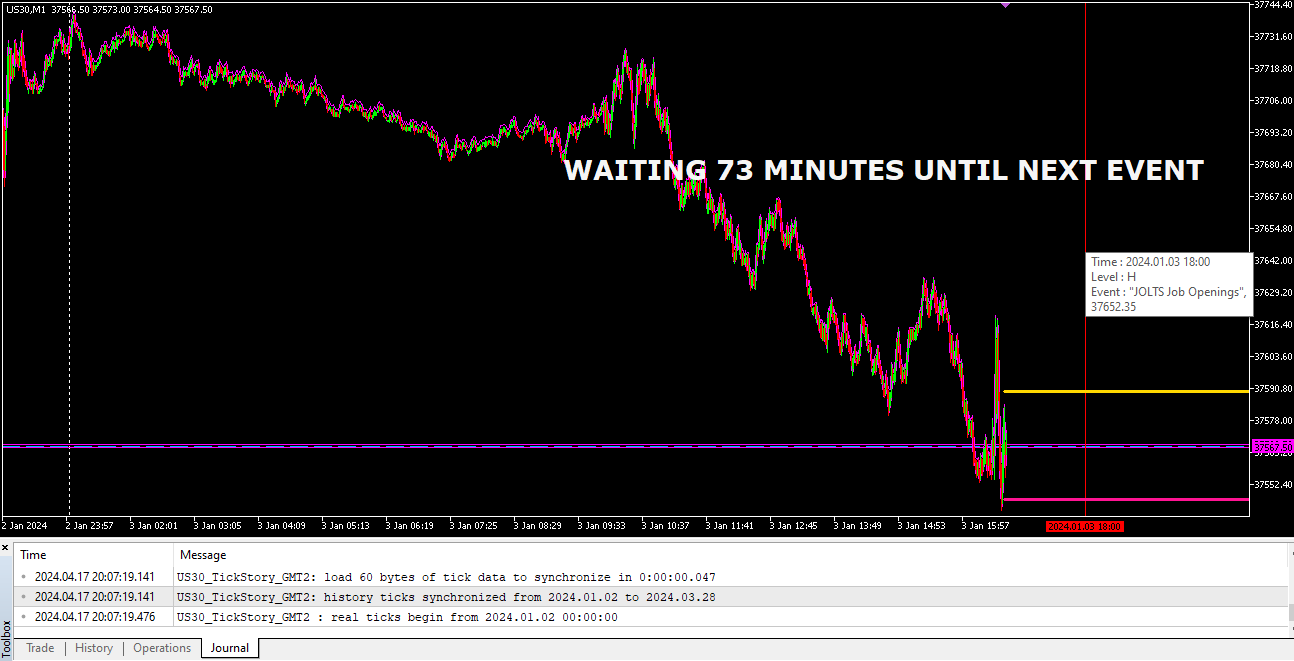
- Event indent entered, Auto Price Alignment function is turned off and Arbency is allowed to search for trades.
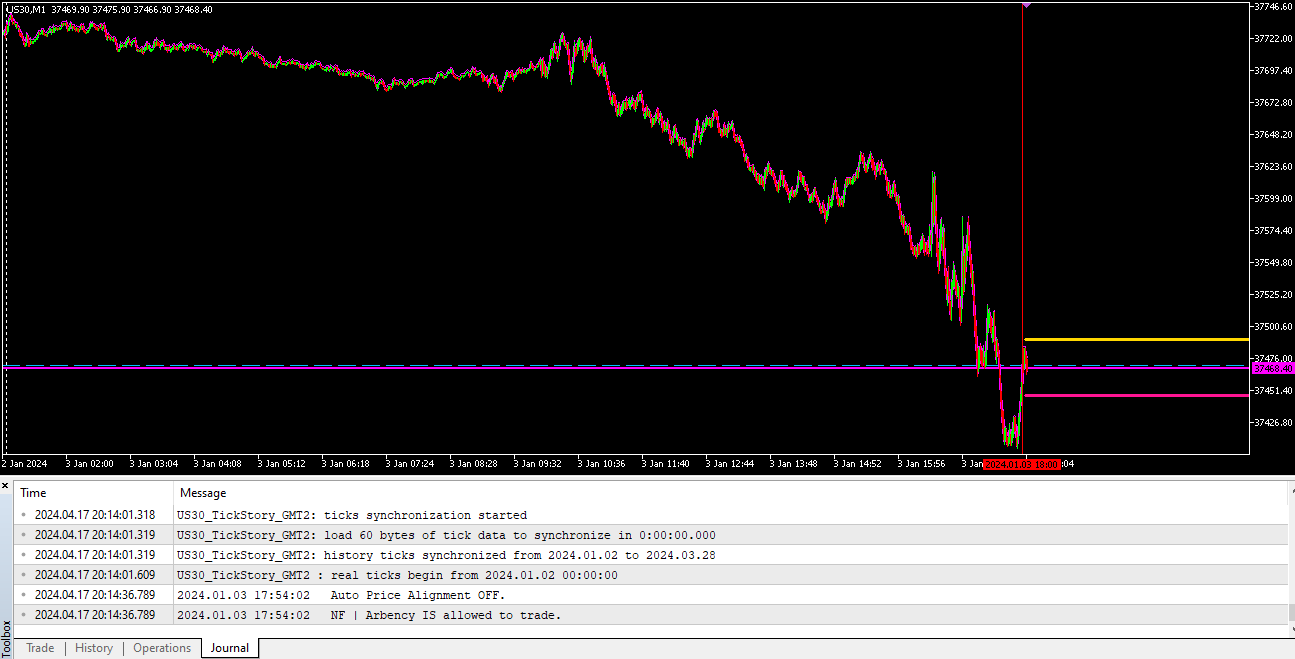
- Event indent passed, Auto Price Alignment is turned on and Arbency is not be allowed to open trades until the next event indent.
—
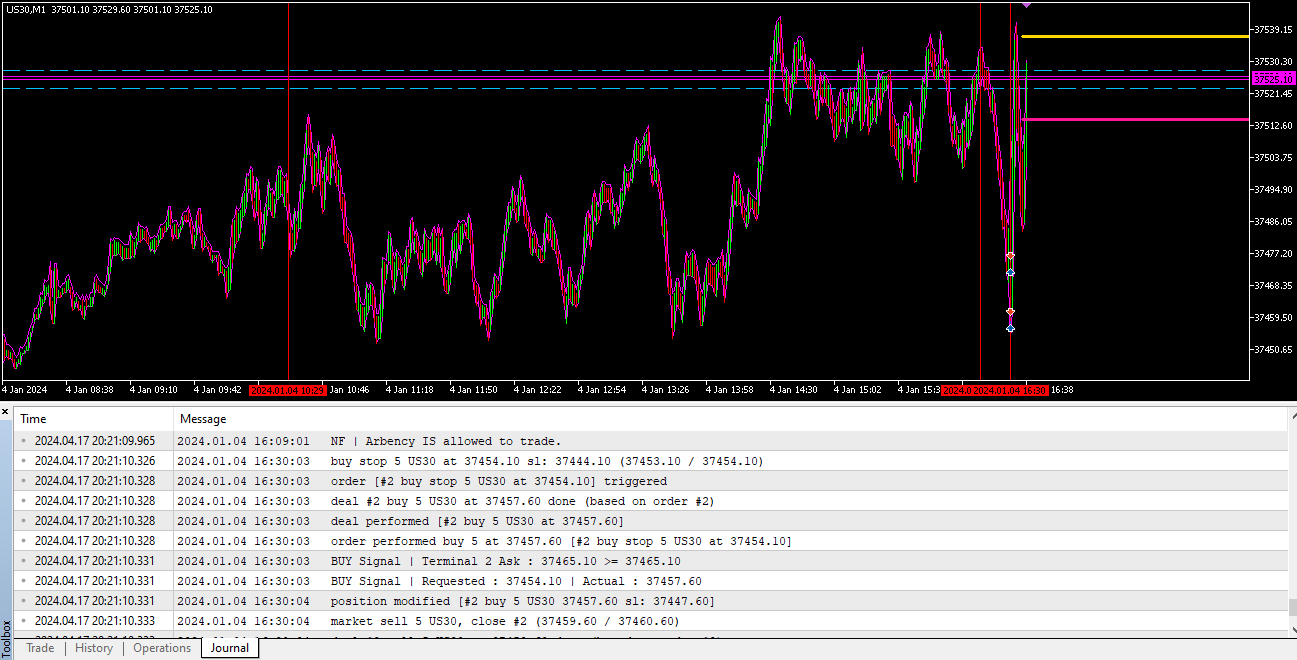
- Here two trades were opened. We can use the information entered into the log to gain an understanding how exactly the strategy has been executed.
- 16:09:01 Arbency enters the news indent and is allowed to trade.
- 16:30:03 Arbency places a Buy Stop of 5 lots at 37454.10.
- 16:30:03 The Buy Stop is opened.
- 16:30:03 Buy Stop opened at 37457.60.
- 16:30:03 MT5 tells us a Buy trade is now open at 37457.60 from Buy Stop 37454.10.
- 16:30:03 Arbency sends first BUY Signal log print showing that the connected termianl price level ‘Terminal 2”s Ask ‘37465.10’, was above or equal to the buy level offset at the time ‘37465.10’.
- 16:30:03 Arbency sends seconds BUY Signal log print showing the Requested buy price level that was sent to the server ‘37454.10’, and the Actual open price that it got ‘37457.60’.
- 16:30:04 Slight modification of the stop loss.
- 16:30:04 Order closed by Auto Close function within 1 second of being opened.
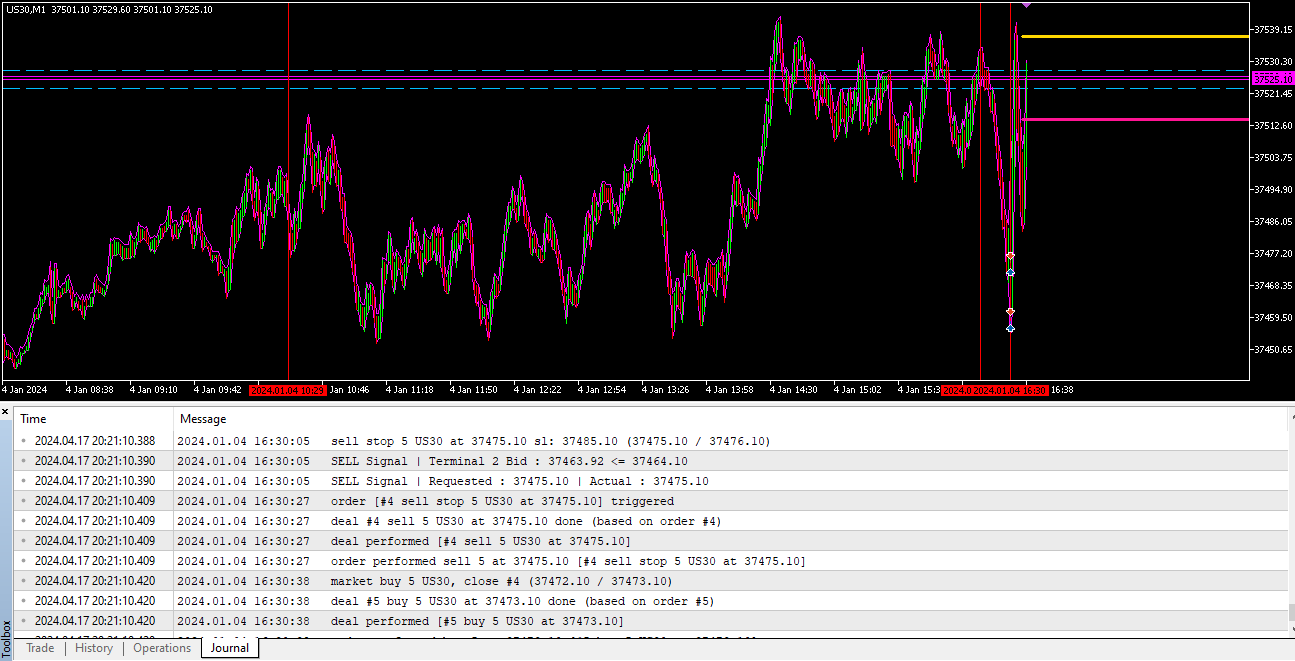
- A sell trade is executed immediately after.
- 16:30:05 Sell Stop of 5 lots opened at 37475.10.
- 16:30:05 Arbency sends first SELL Signal log print showing that the connected terminal price level ‘Terminal 2”s Bid ‘37463.92’, was below or equal to the sell level offset at the time ‘37464.10’.
- 16:30:05 Arbency sends second SELL Signal log print showing the Requested sell price level that was sent to the server ‘37475.10’, and the Actual open price that it got ‘37475.10’.
- 16:30:27 Sell Stop opened at 37475.10.
- 16:30:27 Sell Stop opened at 37475.10.
- 16:30:27 MT5 tells us a Sell trade is now open at 37475.10 from Sell Stop 37475.10.
- 16:30:38 Order closed by Auto Close function.
- Here you can see in the created History information Abency comments the Signal price information into the order comment to help with analysis.
- For the buy trade. It shows the connected terminal price level ‘37465.10’ became above or equal to the buy trade level of ‘37465.10’. The trade opened at ‘37457.60’ and closed two points higher at ‘37459.60’.
- For the sell trade. It shows the connected terminal price level ‘37463.92’ became below or equal to the sell trade level of ‘37464.10’. The trade opened at ‘37475.10’ and closed two points lower at ‘37473.10’.
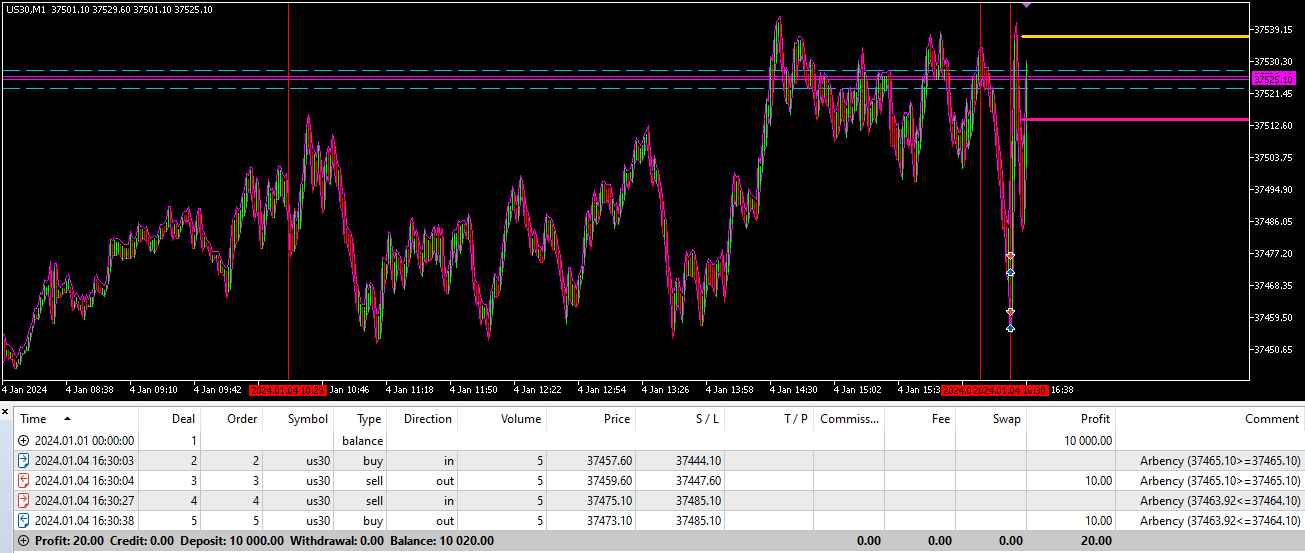
- More example information for analysis…

—
Again this isn’t to be used to create any reliable statistical data. The backtest function has been designed to give an understanding how executions are handled when signals occur and how different inputs work/effect executions.
Latency Arbitrage can’t be backtested, this function is a compromise to allow some backtestability.
6.
- How do I set up Arbency?
- The expert requires at least one ‘Send_(Fast Broker)’ connection and one ‘Node_(Send & Receive)’ or ‘Receive_(Slow Broker)’ connection to function. Have two MT4/5 terminals with different broker accounts ready, open one and open a chart of the pair you want to use, load Arbency with the ‘Current Terminal Function’ set to ‘Send’ and if required matching ‘Custom Pair’ input. Open the other terminal, open the pair, load Arbency with the ”Current Terminal Function’ set to ‘Recieve’ and if required matching ‘Custom Pair’ input. You should then see indication of connection in the logs and Connected Terminal Price Levels will be drawn on chart, adjust price levels if needed either by pressing and then unpressing the Auto Alignment button, &/or manually adjusting price levels to best align with the current bid/ask. When set, ensure Auto Align button is unpressed and Alignment function isn’t active, then leave Arbency to search for oppuritunes during active market hours.
- Do you have a set file?
- No. No set file will work the same all around. Arbency’s profitability will be determined by the broker combination, local hardware and connection capabilities etc, settings will need to be adjusted to best suit individual set ups.
- What is Latency Arbitrage?
- It’s a strategy that takes advantage of quick price movement differences between two or more brokers.
- Do brokers allow Latency Arbitrage?
- Most don’t, they may on a demo account for a short while, if used on a live account and brokers find out they may deny withdrawals. Be sure to check with your brokers terms and conditions to be sure if they allow the strategy.
- Which brokers should I use?
- Ideally the fast broker would be a direct low latency source like LMAX or Rithmic, a reliable ECN broker will also work for the fast broker. The slow broker would ideally allow Latency Arbitrage. Brokers and hardware configurations will perform different all around, clients will need to find their own working brokers and set ups through experimenting.
- What is a ‘Fast’ & ‘Slow’ broker?
- A ‘Fast’ broker is a broker that is likely to acquire their data from a high quality data source and have superior server hardware with better connection to client terminals.
- A ‘Slow’ broker is a broker that it likely to acquire their data from a lessor source and is likely to have lessor server hardware with possible intermittent connection to client terminal, possibly a newly opened broker.
- Do I need a VPS?
- Not necessarily, the expert works best during active market times throughout the daytime, so depening on your location you could turn it on your home PC for the day and turn it off at night it doesn’t need to run 24/7.
- What kind of Ping do I need?
- The smaller the better. We’re looking to take advantage of quick movements and platform delays, ensuring we have the quickest connection to the server will ensure trades are sent and edited as quick as possible.
- Tips for profitable trading?
- Don’t set the Gap_Threshold too tight, be patient and wait for volitile movements to trigger trades.
- Only trade Arbency during active market times.
- Learn when to manage the Auto Price Alignment function. If Arbency is left running 24/7, it will automaticlly trigger the Alignment function at certian times, you will have to unpress the button before your trading session to allow free movement of connected terminal price levels.
- Stick to trading indices, avoid forex pairs.
- Keep order managment quick. Consider closing trades using seconds &/or other quick means.
- Why is the backtest bad?
- Arbency’s backtest function isn’t designed to create reliable stastical data. Latency Arbitrage can’t be backtested. The function is purely made to demonstate how excections are handled when trade signals occur and how chnaging inputs effect order management.
- The data of the second pair hasn’t been exported correctly to match the GMT offset of the first.
7.
I am always happy to help with set up or if any problems emerge, please message me for assistance.
Some basic checks users can make before contacting me with problems are –
![]()
– At the top of the MT4 terminal please ensure the ‘ AutoTrading ‘ button is pushed in, and has a small green icon like the picture to the left.
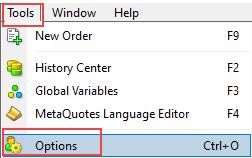
– At the top left of the terminal go to ‘ Tools – Options ‘.
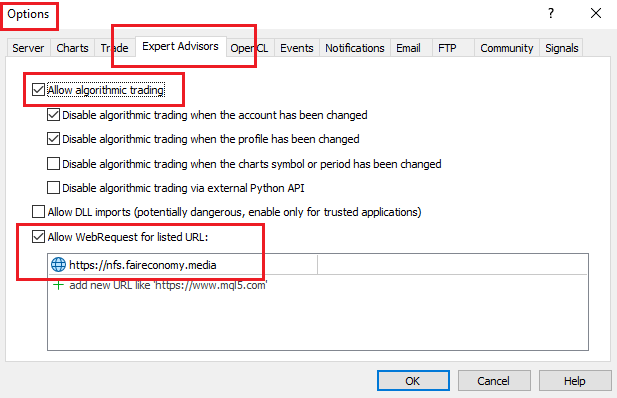
– In ‘ Tools – Options ‘, go to the ‘ Expert Advisors ‘ tab, please make sure, ‘ Allow automated trading ‘ & ‘ Allow WebRequest for listed URL: ‘, are checked.
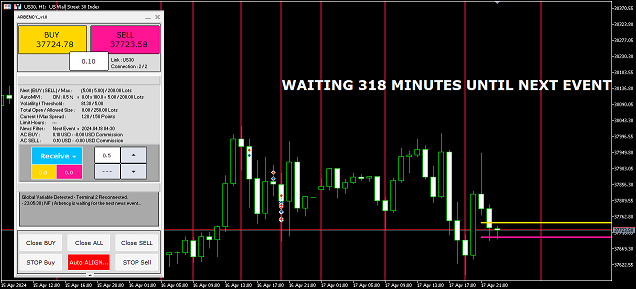
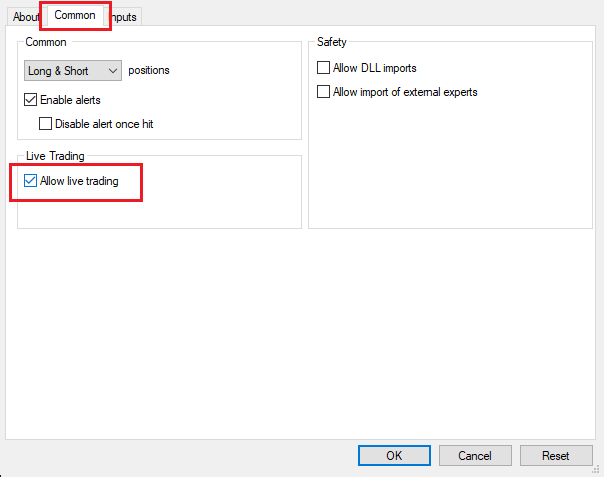
– When loading the expert onto a chart please make sure that in the common tab, ‘ Allow live trading ‘ is checked.

– In the top right of the chart you will see a smiley face if all the steps are followed correctly and the expert will start to search for trades.
![]()
– Please check if the spread of your loaded chart is below the number set in the max spread input.
If you have any problems please contact me using one of the links below.
Links –


